Wednesday, December 2, 2009

Aunt Lynn's Hot Apple Cider (and more Thanksgiving goodies to come!)

Hey folks, I'm back! My apologies to those who tune in; it has officially been one month since my last post. The good news is, it was for a good reason--I had a paying gig at California Watch! The work was temporary, but fun and exciting. It is great to read about other news organizations profiling this awesome new venture, and I am proud to be even a small part of this great team. I even got a recipe from one of my colleagues there, so look out for some guest recipes soon!

I know, you're not here to read about the news or the state of journalism--you're here for the recipes! And with Thanksgiving leftovers looming in the kitchen, you're probably dreading the reinvention of old classics. But never fear, I dug through my cookbooks, picked some family member's brains, and am working on things that include celery, carrots and old Turkey Day staples. Plus, if I get my kitchen clean, I'm even going to attempt mayo from scratch, so I can make fake-turkey salad for sandwiches.

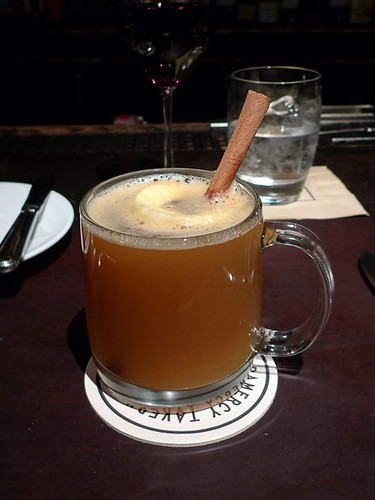
Today's Recession Cooking post is more like comfort food, or rather, comfort drink. My Aunt Lynn is famous for her hot apple cider, which is a staple at Terry family Thanksgivings and Christmases. The smell of apples and mulling spices wafted through the house, and to me, it always stood out more than the smell of the turkey, my Uncle Mike's stuffing (from Great Grandma's recipe) or potatoes boiling, waiting to be mashed. The best thing about it is the kids can drink it and the adults can spike it with their whiskey of choice, which for the Terry's was always Crown Royal. As kids, my cousins and I used to warm up our frozen little digits after playing outside, grasping the steaming mugs and holding it close to our faces. Even as an adult, the cider is the first thing I look for when I enter the kitchen (after hugging everyone, of course.)

Since moving to the Bay Area, my husband and I have celebrated Tofurky Day small-scale--without the dozens of family members that are usually at my mom's and dad's holiday gatherings. There are many reasons why we don't travel back to Oklahoma for the November holiday, but drinking Aunt Lynn's cider always reminds me of home. It's super easy to make and can be done in a Crock-Pot, freeing up another burner on the stove. A well-stocked pantry might even have most of these spices already, which means there are only a couple ingredients you have to buy. Doubling this recipe is also a cinch.

Ingredients:
1/2 gallon apple juice or apple cider
1/4 c. brown sugar
1/2 t. allspice
1/2 t. ground cinnamon
1/2 t. whole cloves
2 whole cinnamon sticks
juice of 1 lemon
juice of 2 oranges
1 whole orange, sliced

Pour all liquid ingredients into the Crock-Pot. Add brown sugar, allspice, and ground cinnamon. Put the whole cloves in a spice ball to prevent them from free-floating. Aunt Lynn suggested using cheap, 50-cent knee-high stockings if you don't have a spice ball. Get new ones at the store when you are shopping, I would never suggest you reuse already-worn stockings. (Unless you want your cider to taste like feet--that's gross.) Toss in your cinnamon sticks and sliced orange. Stir.

If you're using a Crock-Pot, turn it up to high and put the lid on. It will take a few hours before its steaming and ready to drink, but if you start this before you sit down for dinner, it will be ready to drink after you've finished dessert. (The official Crock-Pot website also says cook on low for two to four hours). If you're making this on the stove, use a large stockpot, and heat the juice until it begins to bubble, but not boiling. Then turn down to medium low and leave it be.

If you don't have a spice ball and you don't like the idea of using stockings to corral the cloves, you can always let them free-float and use a strainer to strain them out (along with the extra pulp) before pouring into your mug. Add a shot of Crown (or your whiskey or bourbon of choice) to liven things up a bit.

When I made this at my friends' house, I doubled the proportions, and then had tons leftover. So we poured the remainder into empty bottles, and brought one to a former professor we visited after dinner. If you reheat it, make sure you stir before serving, as the spices will settle at the bottom.

The original recipe also called for 1/4 of regular sugar, in addition to the brown sugar, but my Aunt and I both decided that was too much. It is pretty sweet as it is, so only add this if you really feel it needs it.

Stay tuned for more Thanksgiving recipes, including my PIE SUCCESS! I am super excited that my pie crust turned out this year, because I completely FAILED last year. The next few weeks my husband and I are cleaning out the cupboards and making use of the dried legumes, pasta, and jarred sauce, so it is a Recession Cooking-stravaganza at our house!

Enjoy!

(cider mug photo from Flickr user cloudcity)

Monday, November 2, 2009

Forage Lunch: Pasta Salad (courtesy Ghosttown Farm)

I made a single serving of pasta salad for lunch today, with veggies courtesy of Novella's Ghosttown Farm. Now I didn't make a forage-specific trip to West Oakland, but was in the area already, and stopped by on my way home.

Today Susan Mernit interviewed Brahm Ahmadi, the executive director of The People's Grocery, a non-profit organization dedicated to "develop[ing] creative solutions to the health problems in our community that stem from lack of access to and knowledge about
healthy, fresh foods."

Susan asked me to come along and film highlights of the interview, which we will post on Oakland Local later this week. Brahm will leave the organization soon, once they find a new executive director. They are about to begin a for-profit retail location in the neighborhood--but check Oakland Local for details on that. This is exciting because West Oakland is a notorious food
desert--dozens of liquor stores but no actual grocery stores for several square miles. (Read Brahm's blog post about why he doesn't use this term.)

After the interview, Susan and I stopped by a nearby cafe for a drink and to load footage onto her computer. We parted ways and I headed toward Novella's farm to see what--if anything--I could scavenge for lunch or dinner. With the fall equinox more than a month past, Ghosttown Farm was in transition, compared to how it looked when I saw it a couple months ago. A few ripe tomatoes dangle from vines and many more green ones dot the long, prickly stems. Its hard to say how many of these will actually turn red, especially with less sunlight and the absence of the summer heat.

I grabbed a handful of cherry tomatoes, one cucumber whose vine had dried up and died, a few mixed salad greens and three leaves of rainbow chard. I also found a bit of basil hiding beneath the leafy pumpkin vines, and snapped a few stems too. It had already flowered and most of the leaves had been nibbled by a garden creature, but there are enough to make a tiny, tiny bit of pesto. (Which might turn out to be the dressing for a single salad, or a yummy addition to pizza sauce).

With just a few of these goodies, I made myself lunch in
less than 15 minutes using one small sauce pot and leftover ingredients that were in the fridge and pantry. Unless I'm making myself a bowl of cereal in the morning, I don't like making single serving dishes. Sometimes its out of laziness; if I have to spend time cooking and cleaning the dishes, I want more than a single meal out of the deal. But in this case, it was perfect.

One good thing about Recession Cooking is that it has made me very conscious about portion size. I have a chart inside the door of my pantry I printed from WebMD that I use as a guide. A portion of pasta: a little less than a handful of dry pasta, or 1/2 cup cooked. A serving of veggies is about what you can fit in your hand as well, but ideally you should eat 5 to 7 servings a day (at least!), according to the USDA. Even though it might not seem like a lot of food, I've also discovered eating the right portion size is the best place to begin if you're having trouble feeling satiated. Too many times I've eaten more than I should simply because I've filled my plate and I don't want to waste it.

Eat a portion, then see how you feel. Drink a full glass of water. Are you still hungry? My sister's rule for snacking is the same. If you are still hungry after drinking a full glass of water, then its okay eat a bit more or grab a healthy snack.

Ingredients:
1/4 c. dried pasta (or 1/2 cup cooked)
red onion
green and red bell peppers
cucumber, peeled and sliced
cherry tomatoes
nuts
feta cheese or parmesan cheese
balsamic vinegar
olive oil
lemon juice (optional)
dill (optional)

Pasta salad is great because so many of these ingredients are completely substitutable! Orange for red bell peppers, carrots for cucumbers, chopped tomatoes for cherry tomatoes, you decide. I used pine nuts here because that's what I had, but walnuts or pecans would be fine too. If you have real bacon bits and prefer real meat, it works, you still get protein but more saturated fat and cholesterol.

Cook the pasta according to package directions. I used Trader Joe's fusili pasta, which takes about 9 minutes. If you don't have cholesterol or hypertension problems, add a pinch of salt to your water and it will boil faster. While the water heats and pasta boils, I prepare the rest of the ingredients.

Add the chopped cucumber to your bowl and add a splash of balsamic vinegar, a bit of red onion (about 1 t. if you're into measuring,) and a pinch of dried or fresh dill. Using a fork, mix the cukes and onions around in the vinegar so they are evenly coated. I used frozen, chopped bell peppers, (leftovers from last week!) so I put them in the boiling water one minute before the pasta was done. If you have fresh ones, go ahead and add them to the "pickles" you've got started in the bowl.

Once the pasta is done, drain and rinse under cold water. This stops the cooking process and keeps the pasta from going mushy (especially important if you are making a large batch to take for lunch tomorrow!) Then add your pasta, (peppers), feta cheese (about 2 T), nuts, bacos and anything else you'd like to throw in. I used less feta cheese than a serving, but the great thing about aged cheeses is that they have twice the protein that regular milk products do. Then drizzle a tiny bit of olive oil and stir with a fork. And you're done! (Not to mention, I actually feel full after eating it!)

What is your favorite thing to put in pasta salad? Do you cook single serving dishes? Let me know! And check back later to see what I did with the rainbow chard and the other veggies from Novella's.

Enjoy!

Friday, October 30, 2009

Gramma T's East Coast Tomato Soup


Today's goodness comes to us from Gramma Terry, my dad's mom. She made this delicious soup for my husband and I the last time we visited Oklahoma and it was to die for! She served it with a crusty baguette and it was so creamy and wonderful. Its a miracle that no one on this side of the family has cholesterol problems, because so much of her cooking involves lots of REAL butter and REAL cream. If you are looking for a bit of a lighter fare, you can substitute the butter for non-hydrogenated margarine spread, and substitute the cream for half and half or milk.

I think she clipped this recipe from Southern Living, or Better Homes and Gardens, but I couldn't find the instructions on how to actually make the soup, so I just copied the ingredient list. The instructions must have been on the next page. When I made it at home, I just leaned on my intuition on how to make soup, and tried to think like Gramma T. (I just did a Google search and found it on Taste of Home).

When I got home and looked at the recipe, I was amused that the pad of paper is from the Oklahoma Renewable Energy Council, so I had to mention that. I never expected a food blog would allow me to talk about renewable energy, but why pass up the opportunity? Despite the fact that Oklahoma is still a leader in the nation in producing natural gas, there is an abundant amount of wind that has yet to be tapped. In fact, while reporting for Forbes.com in 2008 as a clean technology intern, I learned that Oklahoma is in the nation's top 10 for generating electricity from the wind, and is number five in the nation for potential wind power.

Ok, so back to tomato soup. I used my favorite roasted tomatoes instead of tomato juice, and I used Kanimi brand Crab Smart crab flavored sea food flakes, which is pollack with a bit of snow crab meat. According to the package, both were harvested sustainably. Canned crab meat works too, but I think it has a bit of a metallic taste from being in the can. You can always omit the crab and just make creamy tomato soup. If you're concerned about seafood sustainability, check out the Monterey Bay Aquarium's Seafood Watch list.

Ingredients:

3 T. chopped onion
1 garlic clove (or 1 t. minced garlic)
1/4 c. butter
1/4 c. flour (you may or may not need this)
1/2 t. salt
1/8 t. pepper
2 1/2 c. half and half or cream
2 c. tomato juice (I used my Roasted Tomatoes)
1/4 t. Worcestershire sauce1/4 t. ground savory or thyme
hot sauce to taste
2 6-oz. cans of crab meat
garnish with sour cream and parsely

I started by melting the butter in a saucepan and then adding the onions. Sautee the onions on medium heat until they become translucent. You can use green onions too, but they burn quickly, so don't cook for too long. I then added the crab meat, garlic, salt, pepper and worcestershire sauce. To bring out the flavor of the crab, you want to cook it it a bit first, even if the package says "pre-cooked." Make sure the heat is medium or low, because it can stick to the bottom of the pan quickly.

Once the crab is warmed and the smells fill your kitchen, its time to add the tomatoes (juice or
blended; see my earlier recipe for roasted tomatoes here). Turn up the heat just a bit, stirring constantly so the tomatoes begin to bubble. Add the savory or thyme if you haven't already. Because I used a chunkier tomato sauce, I did not use the flour. However, if you are using tomato juice, this is where you would add the flour. Start by adding just a spoonful at a time, stirring until the flour is smooth, so it doesn't form clumps. By adding it slowly and stirring, you will thicken the sauce but prevent weird flour lumps.

Now its time for the yummiest part! Add the milk, half and half or cream (the more fat, the tastier!), and turn up the heat just a bit. Maintain the constant stirring, so the milk doesn't burn and mixes evenly in your soup. You can either turn the heat down and simmer for 15-20 minutes, or serve it as is. Simmering only makes it a bit richer and the flavor stand out more. You can also skip the sour cream and instead add a pinch of parmesan cheese. Add a dash of hot sauce and you're done!

Here's a word of caution: start with one package of crab meat and sautee with butter and onions. That may be plenty for you, especially if you just want a hint of seafood flavor. I wasn't paying attention and added two 8-oz packages. At first I didn't realize that was 1.5 times as much as the recipe calls for. (I should have done the math in my head first, but I was in a hurry).

Sometimes recipes fail. This was a big FAIL for me. The taste was fine, we both agreed, but the consistency was all wrong. Probably because I used chunky tomatoes instead of tomato juice, in addition to having 1/2 cup too much crab. Rather than soup, it was more like a thick, chunky alla panna sauce (like marinara with alfredo sauce).

But, the key to recession cooking is not to give up when things fail! Instead, take a deep breath and do two things: try it again. You will learn from your previous mistakes and try things differently next time. And most importantly, do something creative with the leftovers (in the next couple of days, so they don't spoil! Leftovers do you no good if they end up in the garbage or compost!). Stay tuned for how I reinvented the tomato soup into a pasta sauce.

Enjoy!

Wednesday, October 28, 2009

Mackey's Overnight Oatmeal: "Smarter Choice" than Froot Loops

As we all know, breakfast is the most important meal of the day. In fact, I'm drinking a cup of coffee and eating a vegan cranberry protein cake as I write this post.

Like so many other kids with working moms, my siblings and I didn't always eat a healthy breakfast--I was a huge fan of Pop Tarts and Toaster Strudel. I don't even remember the last time I ate the recently maligned Froot Loops. But I know processed "food-like substances" (as Michael Pollan calls them) did not have fancy labels or logos to indicate the healthfulness of the product back in the 80s and 90s when I was an adolescent.

You might have read about the Food and Drug Administration cracking down on food labeling programs like Smart Choices, as the New York Times reported on Oct 20. Critics contend that unhealthy foods--such as the high sugar cereal Froot Loops and high fat foods like mayonnaise --can brandish this label, which can be confusing to the public.

Three days after the FDA's announcement, the Smart Choices program released a statement saying it would not promote the label and "voluntarily postpone active operations," in order to comply.

But it can be tough to eat a healthy breakfast (regardless of whether you reach for a conveniently packaged, processed food product or cook your own real food). Even for me, I eventually get tired of eating yogurt and granola with bran flakes. And even though I'm not particularly a fan of instant oatmeal (which is great to store in your desk at work and takes 60 seconds to prepare), I discovered a great recipe for regular "old fashioned" oatmeal that doesn't involve 20 minutes of constant stirring over an open stove. And of course, these oats can be bought in bulk and are almost always much cheaper than individually packaged instant oatmeal.

This comes to us from the Whole Foods Blog (say what you will about CEO John Mackey's stance on health care--I like these recipes!), and I have modified it a bit, as usual. A single serving of John McCann's Steel Cut Irish Oatmeal has 150 calories, 2 g. fat, 26 g. carbs, 4 g. sugar and 0 g. sodium; but remember to add a bit more fat for the milk or honey you might add. Regular instant oatmeal (plain) has about 27 g. of sodium per serving. This kind of oatmeal has a richer, nuttier flavor than instant, and doesn't get that slimy, gross texture that I've found in so many instant varieties.

I use little Pyrex bowls, because I can pop them in the toaster oven. But if you have a microwave you can use a regular ceramic bowl (never heat up plastic in the microwave!) This is a wonderful recipe because you soak the oatmeal overnight, and take it to work with you in the morning, and the prep (in the microwave) takes about the same amount of time as instant oatmeal. If you are like me and have no microwave, but depend on the toaster oven, this takes a bit more time, but it is worth it.

Ingredients:
1/4 c. dry steel cut oats
1/2 c. milk (I use soy or almond, but animal milk works too)
1 t. brown sugar, honey, molasses, or maple syrup
1/4 to 1/2 c. fruit (frozen, dried or fresh works)

If you're using dried fruit, put it in the bowl first to ensure it soaks up as much liquid as possible. Add the oatmeal to the bowl and cover with (soy) milk--you'll need about twice as much milk as oats. Now add the sweetener at your own discretion--I usually add about a teaspoon, and alternate between real maple syrup and brown sugar.

However, I've discovered that if you're using flavored milk substitute (such as vanilla flavored almond milk), you need much less sweetener than you would if you used regular cow or goat milk. The Whole Foods recipe calls for lemon zest and a teaspoon of vanilla extract, but you don't really need it.

Let the mixture soak overnight. In the morning when you get up, check to see if the oatmeal has expanded to rise above the level of the milk. Add a splash of milk if it has. I sometimes add a teeny pat of butter, but skip it if you have cholesterol problems. If you're using frozen fruit, add it to the bowl now.

When you are ready to cook, pop the bowl in the microwave for one minute. Stir, and cook for one more minute. If you're using the toaster oven, cook for 10 minutes on 375 degrees, in an oven-safe container. Cooking times may vary, so you might want to cook for seven minutes, stir and cook for seven more minutes. If you're using fresh fruit, add it now and voila! Healthy oatmeal and YOU control the amount of sugar you use. Now that is a smarter choice.

Enjoy!

Monday, October 5, 2009

Lentil Burgers: always e-coli free

If you are horrified by reading a recent New York Times article about how a 22-year old woman was paralyzed after eating a contaminated hamburger, ("E. Coli Path Shows Flaws in Beef Inspection") learning how to make "burgers" from non-meat products might suddenly sound more appetizing. I did not set out to write this post as vegetarian manifesto, standing on a box of Dr. Bronner's Magic Soap, saying "I told you so," in a nanny-nanny-boo-boo voice. But when a news peg falls in your lap, it's too good to pass up.

In 1996, about a year into my vegetarianism, Kraft's Morningstar Farms products appeared in the my grocer's freezer section. Coming from a household (and a "southern" food culture) that was meat and potatoes, eating fake meat products made the transition--and resolution to stay meat-free--much easier. More than a decade later, while reading Michael Pollan's Omnivore's Dilemma, I discovered that the fake meat products all had corn and soy in them. I had a crisis of conscience when I realized the meat replacer "food-like products" were a part of the same industrial food chain that I was protesting against.

I wish I would have discovered lentil burgers earlier. At the time I read Pollan's book, I was in grad school and had absolutely no time to be making burgers from scratch. But as a freelancer still in search of regular assignments, I've got the time to plan soaking and cooking lentils. I got this recipe from a cookbook our former neighbors left us when they moved out of this apartment. We thought they were at least healthy eaters because they got the same CSA delivery box we did. I adopted this recipe from Meatless Meals for Working People, which also has an extensive section on vegetarian and vega n selections from fast food restaurants.

Ingredients:
1 c. lentils, soaked overnight in water
1 small onion, chopped
1/2 c. wheat germ
1 or 2 garlic cloves, mashed or minced
salt and pepper to taste
2 pinches of cumin
2 pinches of paprika
1 tbs. oil or butter

Remember lentils will expand several times, so you may need to add more than a cup of water while they are soaking. In a 2 or 3 quart saucepan, sautee the onions and garlic until they are slightly golden and transparent. Add the lentils and enough water to cover; cook on medium heat, stirring occasionally, for about an hour. Add salt, pepper, cumin and paprika. Because you are mashing them into patties, its okay if they split open or break into pieces.

After the lentils are cooked, drain any excess water if it seems to soupy. Add wheat germ and butter or oil, and mix and mash together until you can form patties. Fry on a skillet with a bit of extra butter or oil, turning to cook both sides evenly. Serve on a warm roll with lettuce and tomato, or if you're feeling spicy, add some curry mayo. It would be best to add curry to Miracle Whip, because regular, un-sweetened mayo wasn't as great as I expected.

The recipe says this will serve 6, but I made 4 patties; I cooked two (ate one) and froze the rest. I'm happy to report that reheating the cooked frozen patty in the toaster oven (375 deg for abt 17 mins), was nearly as delicious as the freshly-cooked one. The other good news is that the onion lentil mixture is a great base for lentils and some Ecuadorean food that I will attempt soon.

Now eating frozen lentil burgers may not represent the pinnacle of health, but it is a quick, hearty meal when you are too exhausted to prepare and cook from scratch. And unless you have some serious hygiene issues, there is practically no chance you could contaminate these burgers with e. Coli. The nutritional information from this recipe book says each serving has approximately: 147 calories, 4 g. fat (more depending on how much butter you use), 10 g. protein, 21 g. carbs, 3 mg. iron, 21 mg. calcium, 4 g. fiber. According to Nutritionpedia, a 2 oz. serving of a real hamburger patty is: 100 calories, 60 g. fat, 10 g. protein, 0 carbs, 0 iron, 0 calcium, 0 fiber. (However, most hamburger patties begin at 4 0z--hence, a quarter pounder).

There isn't anything else I can say about the industrial food chain--or the health, environmental, labor, immigration, and cultural consequences of this food system--that many others have already said, or written about in length. But if there weren't enough other (aforementioned) reasons to try making lentil patties instead of beef burgers, lentils are dirt cheap, more so if you can buy them in bulk. Even if you live far from a locavore oasis, natural food stores or ethnic grocery stores or "world markets" carry bulk grains and legumes, like The Earth in Norman, Oklahoma.

Enjoy!

Mexican Lasagna: Ellen's Taco Stew, casserole redux

This is a different take on a classic recipe for which my cousin Ellen is famous. It is similar to chili, but has more vegetables, and can easily be made vegetarian-style. You can make it super-spicy, or stick to the original recipe and keep it mild. Taco Stew is easy to make, delicious and requires little clean up. My husband had the idea for "Mexican Lasagna," which began as just an idea, and we brainstormed until we came up with this tasty concoction.

I realized that this meal counts as recession cooking because it isn't very expensive to make, is very hearty and makes great leftovers. However, it doesn't exactly qualify as "made from scratch," unless you have access to fresh corn and a case of tomatoes you've canned yourself. Some foodies would disagree that food that comes from a can is not as healthy for you as freshly picked, but I'm discovering, as fellow J-school alum Sierra Filucci did in her recent East Bay Express article, ("Back to the Microwave," September 23, 2009), that cooking food from scratch is not only incredibly time-consuming, it also means you're tethered to the kitchen scrubbing dishes every night.

Don't get me wrong, if I had a case of self-canned tomatoes, I would love to make taco stew (or Mexican lasagna) from scratch. But cooking on a budget is often a compromise, and I'm trying to find the balance between staples that are easy to stock in your cabinet (canned tomatoes), and scouring the farmer's market for cheap and fresh food.

I do make one exception, though. I ALWAYS buy organic tomatoes. And not simply because I think they taste better. In addition to the benefits to the farm workers who are not exposed to pesticides, I learned that tomatoes, like strawberries, absorb and retain the most pesticides
compared to all other fruits and vegetables. (Thanks to this great book, Tangled Routes, now in its 2nd edition.) Eat organic. It's better for the farmers, better for the earth and better for you.

Well, food neuroses aside, prepare yourself for a delicious meal! I'll begin with the original taco stew recipe (with spicy additions), then create the Mexican lasagna by layering stew, tortillas and cheese.

Ingredients:

1 pound ground beef, cooked and drained or 1 bag burger crumbles (Morningstar Farms or Quorn will do)
1 med. red onion, chopped (about the size of your fist)
2-3 cloves of garlic (I use more, but modify at your own discretion)
2 14-oz. cans diced tomatoes
2 10-oz. cans Ro*tel
2 14-oz. cans sweet corn, drained
1-2 red bell peppers, seeded and chopped (1 large or 2 small)
1-2 green bell peppers, seeded and chopped
2 packages taco seasoning
2 packages Ranch dressing mix
1 can cheddar cheese soup
2-4 c. shredded Mexican cheese OR
1 package cotija cheese, crumbled
Corn tortilla chips

Extra Spicy Additions and Substitutions:
Muir Glenn fire roasted tomatoes (Substitute)
Hot Ro*tel (S)
Hot Taco seasoning (S)
Fiesta Ranch dip mix (S)
1 poblano pepper, seeded and chopped (Add)
1-2 jalapeño peppers, seeded and chopped (A)
1 habanero chili pepper, seeded and chopped (A)
1 can chipotle peppers in adobo sauce (A)
Red Hot Blues blue corn tortilla chips (S)
1 can fiesta nacho cheese soup (S)

Mexican Lasagna:

1-2 packages corn tortillas instead of tortilla chips

I know, I know, Ellen's original recipe includes "ground beef" which I railed against in my last post. However, meat eaters, I assure you my husband eats the fake meat version all the time and LOVES it! I have yet to try substituting chopped mushrooms and black beans for fake meat, but I bet that would be tasty too.

To begin, you'll need a large stock pot, about 6 quarts or larger. Add a few glugs of olive oil to
the pot, enough to cover the bottom. Sauté onions and garlic for a few minutes on medium-high heat, until the onions start to become translucent. Add fake meat (or beef) and more EVOO if needed, stirring constantly. Cook fake meat for about 5 or 10 minutes, until its no longer frozen and in clumps. (If you use real beef, brown and drain the grease). Add one package of taco seasoning, and stir in red and green bell peppers and hot peppers if you like it ¡HOT! Continue stirring for a few minutes, until the peppers begin to become soft.

The rest is easy. Add your cans of tomatoes, Ro*tel, corn (drained of water, remember!), the other package of taco seasoning and Ranch dip mixes, cheese soup, and for the spicy version, the can of chipotle peppers. Once all ingredients are in the pot, stir until everything is evenly distributed and the whole mix begins to bubble. Turn down to low and simmer for at least 20 minutes. Serve in a bowl with tortilla chips and shredded cheese or crumbled cotija cheese.

Mexican lasagna:

This is the same basic principle of making a lasagna--layering.
We took tortillas and cut off the round edges, creating squares or rectangle shapes. Lay the tortillas on a baking sheet and heat in the oven for 20 minutes at 375 degrees, turning once halfway through. They should be firm, but not too crispy. In this case, you don't need to let the taco stew simmer for 20 mins; it will do that in the oven.

In a 9 X 13 pan, begin your layers with tortillas, then a few spoonfuls of taco stew to cover. Then add crumbled cotija cheese and shredded Mexican cheese. Continue layering until you have reached the top of the casserole dish, leaving room to top with cheese. Cover with foil and cook for about 20 minutes at 375 degrees. Remove the foil and cook for another 20-25 minutes, until the dish is bubbly and calling your name. Cut and serve like lasagna!

¡Enjoy!

(In light of recent FCC rulings about bloggers, I'd like to note, I have not been paid by anyone to advertise a brand or a particular product. All of the brand name products I mention, I do so because they are "tried and true" brands that we use every time and we like very much. This is only an "endorsement" in the sense that we use and like these ingredients, but feel free to use which ever brand you prefer).

Feel Better Tea: a companion


Thanks to plenty of rest and this potent tea, I can say I am definitely much better than a week ago. This is the tea I usually make when I'm feeling under the weather, and can be the base for a much stronger tea when the "common cold" knocks you on your rear. It's basically a concoction of things my grandmother would suggest, and might have resembled something her grandmother used to brew.

My great-grandfather (my grandma's dad) was a pharmacist, but grandma used to say the only thing she ever saw him take was an aspirin. For a cough or sore throat, a hot tea was always the way to go. Lots of honey and lemon, mixed with chunks of ginger soothe your mouth and open up your lungs. I try to use local honey because I think it somehow tastes better, but it's hard to tell whether using it to treat allergies is an effective way to combat irritating pollen spores from the area.

Zingiber officianle, (ginger) however has been noted by many cultures to have medicinal properties, as this University of Maryland Medical Center article describes. (If you are taking medication, make sure to read to the bottom about medical interactions with ginger!) One good whiff of its spicy, earthy scent bubbling in a pot of hot water is enough to remind your senses you will feel better soon. Commonly (mistakenly) called "ginger root," the firm flesh you are about to eat/drink is actually the rhizome of the plant.

Another zinger I added to this tea was fennel seeds--if you add a lot, it will give it a sweet, licorice taste. A commercially packaged tea called Throat Coat uses fennel too, which is where I got the idea. (Straight fennel is too sweet for me, and probably for most people who don't love black licorice flavor). A well-stocked pantry usually has most of these items on-hand already. If you live in California, you can probably scavenge fresh fennel from a neighbor's unkempt side-lawn--it grows wild all over here.

Ingredients:
Fresh ginger (one or two thumb-sized pieces)
Local honey (several tablespoons, or to taste)
2-3 Ts Fennel seeds
or three chunks of fresh fennel stalk
juice of 1 small lemon or half a large lemon

Extras:
organic green tea bag
2-3 cloves (2-3 ts minced) garlic (don't freak out! I'll explain)

If you don't have a tea strainer, you can throw all of these things into your mug and sip around them or chew as you go. I measure a chunk about the size of one or two of my thumbs and break it off from the larger piece. Peel with a potato peeler and cut into pinky-nail-sized chunks. Add the honey, lemon and fennel seeds. If you are using fresh fennel, make sure to scrub it well before you chop into small pieces (abt. the size of the ginger chunks). I add a bag of my favorite green tea, but you don't need it.

Now I know it might sound wretched (to anyone who hasn't eaten my cooking), but putting several big chunks of garlic in your tea will make you feel better if you are wrapped in a blanket, engulfed with a growly, phlegmy cough and generally too miserable to leave your abode. According to the Herb Society of America, Allii sativi bulbus, garlic, has also been used for centuries for its anti-microbial purposes, one of which is the treatment of respiratory illness.

You must be thinking, 'gross, who wants to drink garlic tea?' But who actually enjoys the taste of cough syrup or Theraflu anyway? It might not taste wonderful, but it will make you feel better--even if its just enough to get yourself to an actual health care provider.

If you are still needing something strong for your tea, the ginger-garlic-fennel base is an excellent starter for a hot toddy. Just grab some whiskey (ahem, adults only, please) and slosh a glug or two in your mug. By this point, you won't care what it tastes like, and you'll probably be asleep before too long! Another great-grandfather (my grandfather's father) used to brew moonshine in Oklahoma before Prohibition was lifted in 1959, so the whiskey they put in their tea was definitely homemade!

Enjoy!

(note: these statements are not meant to give medical advice or treat or cure any disease. they have not been approved by the FDA.)

Monday, September 28, 2009

Feel Better Soup


While eating soup for breakfast may not seem like a revelatory act, it's significant for me, because breakfast food is nearly always the first thing that crosses my lips, despite the actual time of day when I am eating. (Look out for a variation on "overnight oatmeal" a recipe adapted from the Whole Foods blog).

I woke up craving warm liquid, but was dismayed to find out our ginger root is more suited for the compost heap rather than hot tea. My mind then gravitated to plain vegetable broth, which is as simple as boiling water in the tea pot, and stirring in a mug with a few tablespoons of the powdered broth I bought in bulk from the Berkeley Bowl.

This grocery store is most well-known for its vast selection of produce and fierce battles for an elusive parking space, but what I love about the Bowl is its selection of bulk foods and cosmetics. In addition to the staples you might find at most bulk food aisles in natural foods stores, Berkeley Bowl has staples for vegetarian cooking--chili mixes, textured vegetable protein, and non-chicken powdered mix that is a great base for any soup, stew or homemade meat substitute calling for water. Buying in bulk is the easiest way to save money at the grocery store, even if you are buying organic.

Today I wanted a little more substance, and could feel the need for protein and carbs. So I whipped this up in about 10 minutes, by grabbing a few things in the freezer and with little imagination needed.

Ingredients:
1 1/2 c. water, boiling
1/2 c. pasta (about a handful of fusilli, rigatoni or macaroni)
1 green onion, chopped
3 frozen meatballs (I used Trader Joe's Meatless Meatballs)
3 t. veggie broth powder (or one cube of bouillon)
dash of salt to boil the water quicker

The vegetarian broth calls for 3 teaspoons of powdered stuff for every cup of water, but I suggest using it to taste, depending on how salty you want it. I dropped three frozen meatless meatballs into a small pyrex bowl and popped it in the toaster oven--> 10 minutes at 375 degrees.

Then I boiled the water and dropped in a handful of pasta, stirring occasionally. Turn the heat down a bit, but keep the water boiling (follow package directions to determine how long you need to boil). About 5 minutes into the 9 minute boil, I added a few green onions and the veggie broth, continuing to stir. After the toaster oven dinged, I carefully dropped the meatless balls into the pot and continued to stir until the pasta reached the end of its 9 minute tenure. And you're done!

The reason why this was so quick and easy was because I chopped the green onions and froze them last week, before I left on the trip. Some may argue whether frozen food is more nutritious than fresh food, but I chose the freezer over the trash can--those onions would've rotted after a few more days in the vegetable drawer. Meatless meatballs can, of course, be made from scratch, but the ones TJ's makes are pretty tasty and cheap AND packed with protein. A one-pound bag is about $3.50, and a serving of 6 meatballs has 16 grams of protein.

Today the soup was a bit saltier than I usually like, but I didn't have the patience to add more water and onions and get it to the right temperature again. I feel better and now have the gumption to go to my neighborhood corner store and grab the ginger I need for my hot tea.

Enjoy!

Friday, September 18, 2009

Farm Fresh-Giada-Oliver Marinara


I LOVE TOMATOES! I don't ever remember my mom making marinara sauce from scratch, but she did always add bay leaves and rosemary, which I called "leaves and sticks," and would always pick them out in disgust. She reminded me then that is what brought out the flavor. Now rosemary is my 2nd favorite herb. Tomatoes are almost always accompanied by rosemary in my cooking now (except for Mexican food).

Until recently, we subscribed to a CSA that delivered organic, locally-grown food to our doorstep. Sometimes the tomatoes would arrive fully ripe and ready for eatin' and other times, they needed a few days to ripen.

Sad to say, I didn't always get to them before they were too ripe. But I found this recipe for roasted tomatoes in one of the newsletters we got in our box from Farm Fresh to You. Basically, it is for tomatoes that are too soft to slice for sandwiches and burgers, but before they're moldy!

I do not advocate trying to cook spoiled food to save money. I do advocate using all of the fruits and veggies even if they are "less-than-fresh," which was the case with the tomatoes.

After three attempts to make marinara sauce, I eventually combined several recipes: one from the Farm Fresh newsletter, one from a Jamie Oliver cookbook, and one from the Food Network's Giada De Laurentiss website.

Ingredients:
tomatoes
garlic
basil (fresh is best, but dried will do)
oregano
rosemary (if you use dried, use less than you would if you picked it fresh)
bay leaf
crushed red pepper (or one fresh red pepper)
salt & pepper to taste
yellow onion
white wine
red wine vinegar
olive oil (extra virgin is the tastiest, but you can use light if you have it)

First, cut out the stems and any bruised or ugly spots from the tomatoes. Lightly drizzle olive oil in a baking dish and put in the tomatoes. I smash one garlic clove and stuff into each tomato, but use the garlic at your own discretion. Now sprinkle tomatoes with a bit of white cooking wine, salt & pepper, and a handful of oregano and rosemary. Roast in the oven @ 200 degrees for 8 hours +/- (this is best done at night before you go to bed). The skins should be browned and carmelized by this point.

Take out the tomatoes and let them cool. Carefully spoon the tomatoes, herbs and juices into a food processor or mini-food chopper and blend until they are an even consistency.

In a saucepan, sautee 1/2 c. (about a handful, chopped) of yellow onion, a smashed clove of garlic, and a few tablespoons of olive oil (medium-high heat) until onions are translucent. Add 2 T of crushed red chili peppers (in a pinch, you can use leftover packets from the pizza delivery place). Stir for 5 mins.

Add yummy tomatoes and reduce heat to low.

Stir in 1 T crushed oregano, 1 bay leaf, 1 T crushed black pepper and pinch of salt. (if you like a sweeter marinara, halve the salt and add two Ts sugar or honey). Add 1 t red wine vinegar and a handful (or two!) chopped fresh basil (if you are using dried basil, i would add 2-3 Ts).

Simmer uncovered on low heat for 1 hour, stirring occasionally.

Enjoy!

(note, depending on how many tomatoes you use and how long you simmer, this sauce may be pretty watery. If you prefer, add 1-4 oz. can of tomato paste to thicken it up.)

Recession Cooking from a California-Okie


Welcome to the Recession Cooking blog!

As a recently graduated, newly unemployed journalist, I'm looking for ways to practice my craft, but not give away my best stuff for free. Writing about food is the best way to do this, because we all have to eat, cooking from scratch saves money, and using less-than-fresh food is one way that my relatives coped with the Great Depression. Hopefully this will give you new ideas about cooking, encourage you to try something new or different, or at least give you a chuckle or two.

I currently live in California, but I was born and raised in Oklahoma. While I lived in the Sooner State, having ancestors that endured the Great Depression and the Dust Bowl was a source of pride, but something I never really thought about in depth. Living in California, I often meet people who say, "my grandparents moved here from Oklahoma during the Dust Bowl." Now I take great pride in knowing that even though some family members came to Bakersfield for the oil boom, most of them returned to their home state.

This is inspired by all of the wonderful people in my family (mostly women), who have spent so many years cooking and creating amazing concoctions for holidays, birthdays and Sunday dinners. In addition, I have to give credit to my friends that inspire me: Sindya, who lived on a food stamps budget for a week as a food-writing experiment; Novella, who raises farm animals, grows fruits and veggies and cultivates bees in the gritty West Oakland neighborhood known as Ghosttown; and Caesaré, a social/food justice advocate and vegan chef.

I'll be posting at least once a week, and I encourage you to post comments or submit your own creative food creations. Hopefully I can convince a few of my friends to write guest blogs every now and then. Enjoy!